Wednesday, December 16, 2009

Technical Analysis of bi-directional Sun IDM and AD password syncing

One of the more common uses for Sun Identity Manager is to sync passwords to an Active Directory environment. If AD is not used as the primary authentication service, you'll probably also need to sync passwords back from AD to IDM, so that users can change their password from their workstations. This is especially important in the case where their password has expired and they can't access the IDM web interface to change it without logging into their workstation. Sun IDM provides methods for this bi-directional sync, but the documentation prior to version 8.1 is very sparse and even in 8.1 it is lacking in some areas and fragmented into several separate documents. This post tries to consolidate the information and fill in some of the gaps.

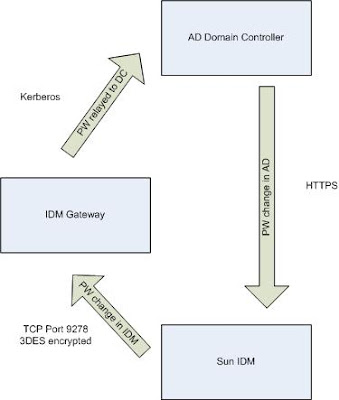
The two additional components that are required for password synchronization are the IDM Gateway, which synchronizes from IDM to AD and PasswordSync, which synchronizes from AD to IDM. Below is a diagram that details how the different components work together and communicate.


Here is a quick list of best practices to follow. For more detail about the communication protocols read on past the bullet points.

  • Change the default Gateway encryption key

  • Use an active-standby configuration behind a load-balancer for the IDM Gateway. Active-active is not supported.

  • Ensure that you are using encryption between the IDM Gateway and the DCs, either Kerberos or SSL.

  • Ensure that you are using HTTP over SSL for the communication from the PasswordSync application on the DCs to the PasswordSync servlet.

  • Use a JMS server to handle the PasswordSync events. This will help ensure that no password changes are lost and allow for much better auditing of change events.


The communication between the Sun IDM application and the IDM Gateway is done over port 9278 using the usual protocol for communication with resource adapters. This traffic is encrypted using 3DES by the RASecureConnection class. This may come as a bit of a surprise, since the AD resource adapter in IDM has an encryption type setting of None, Kerberos, or SSL. This setting is for the communication between the Gateway and the DC, not between IDM and the Gateway.

Since 3DES is a symmetric protocol, it is important that you change the key from the default key that is compiled into the application. You can do this through the IDM admin interface, Server Tasks -> Run Tasks -> Manage Server Encryption and select "Manage Gateway Keys"

Password changes initiated through standard methods in AD (i.e. administrative resets, user-initiated changes) are sent to IDM through the PasswordSync application. This application is installed on the DC and configured through the user interface as detailed here. It communicates with the PasswordSync servlet, which is shipped with IDM and by default runs as part of the IDM web application. However, it can be split out into a separate servlet container. There are two options for the communication between the PasswordSync servlet and the IDM application. The simpler, but less reliable option is direct communication to the IDM application, the other is to use a Java Messaging Server (JMS), which the IDM application will interface with. This will allow for queuing, guaranteed delivery of the password change messages and better reporting and logging. The JMS method is preferred, as without it, password changes may be lost if there is a problem with the IDM application.

You will need to ensure that the PasswordSync -> PasswordSync servlet communication is encrypted via SSL. You will need to import the SSL certificate that the PasswordSync servlet is using onto the DCs as documented here. You will also need to remember to update it on the DCs whenever the certificate is changed or renewed.

Friday, October 23, 2009

Running Sun Directory Server 6.3 as a non root user

It's a standard best practice to run services with a dedicated user if possible. Sun's Directory server Enterprise Edition supports this, but, as with many Sun products, the documentation on how to do so is scattered in many different places. Here's a quick how-to guide on to do it for DSEE 6.3.1 on Solaris 10. This only covers the Directory Server component, not the Directory Proxy Server or Control Center components. But don't worry, more posts are in the works for those components!

These steps presume that you have already installed the DSEE software.

Step 1, create the user. Here's quick instructions to create username "ldap" with group "ldap":


groupadd ldap
useradd -g ldap -s /bin/false -c "ldap" ldap
usermod -K defaultpriv=basic,proc_owner,net_privaddr ldap


If you're not familiar with Solaris's RBAC (Role Based Access Control) , the last command grants the ldap user the privileges to bind to a privileged port number (net_privaddr), which is needed to use the standard LDAP ports of 389 and 636. The proc_owner command allows the ldap user to send signals to other processes as well as those that it owns.

Step 2, create the directory server instance.

dsadm create -p 389 -P 636 -u ldap -g ldap /opt/ds_homedir


Where the last argument is the directory that you want to use to store the configuration and data for your new instance.

Step 3, enable the service within SMF. This has two functions: first, it will make sure that the service will restart automatically when the server reboots, second, it enables you to start/stop the directory service as the root user without having to switch to the ldap user first.

If you installed using the Native Package install, it's easy, since the installation contains a built-in SMF manifest. Just run the following command to activate it:

dsadm enable-service --type SMF /opt/ds_homedir


However, if you used the ZIP distribution, it's a little more involved, since you have to create your own SMF manifest and register it manually. Below is the one that I use. You'll need to modify the exec commands to specify the directory of your instance. The timeouts are purposely long, as DS will often need a long time to re-check the database after an ungraceful shutdown (i.e. system crash):


<?xml version='1.0'?>
<!DOCTYPE service_bundle SYSTEM '/usr/share/lib/xml/dtd/service_bundle.dtd.1'>

<!--
Document : ds_ldaptest2.xml
Created on : 23-OCT-2009
Author : Keith Bucher
Description: The SMF Service Manifest file for Directory Server 6
-->

<service_bundle type="manifest"
name="SUNWldap-directory services">
<service name="application/sun/ds" type="service" version="1">
<dependency name="filesystems" grouping="require_all"
restart_on="none" type="service">
<service_fmri value="svc:/system/filesystem/local:default">
</dependency>
<dependency name="network" grouping="require_all"
restart_on="none" type="service">
<service_fmri value="svc:/network/initial:default">
</dependency>
<exec_method type="method"
name="start"
exec="/opt/sun/ds6/bin/dsadm start --exec /opt/ds_ldaptest2"
timeout_seconds="600">
<method_context working_directory=":default">
<method_credential user="ldap"
group=":default"
privileges="basic,proc_owner,net_privaddr"/>
</method_context>
<stability value="Evolving">
</exec_method>
<exec_method type="method"
name="stop"
exec="/opt/sun/ds6/bin/dsadm stop --exec /opt/ds_ldaptest2"
timeout_seconds="600">
<method_context working_directory=":default">
<method_credential user="ldap"
group=":default"
privileges="basic,proc_owner,net_privaddr"/>
</method_context>
<stability value="Evolving">
</exec_method>
<instance name="default" enabled="false">
<stability value="Evolving">
<template>
<common_name>

<loctext lang="C"> Directory Server </loctext>
</common_name>
<documentation>
<doc_link name="Directory Server Enterprise Edition 6 Administration Guide" uri="http://docs.sun.com/doc/819-0995/"
/>
</documentation>
</template>
</service>
</service_bundle>


Once you've created this file, use the following commands to register it with SMF and enable the service:


svccfg import /opt/ds_homedir/config/manifest_file.xml
svcadm enable svc:/application/sun/ds:default

Thursday, March 26, 2009

Configuring gzip/deflate compression on IIS

An easy way to improve website performance, especially for low-bandwidth viewers, is to use compression to get the data to the user faster. The text portion of web pages (HTML, Javascript, CSS, etc.) compresses very well (90% or so) so the speedups can be significant. The user's web browser needs to support the compression method, this is done with the Accept-Encoding header that the browser will send to the server if it supports compression, for example, the major browsers support deflate and gzip: "Accept-Encoding: gzip, deflate"

Static content can be compressed and then cached, only updating when the original files are changed, so it takes very little CPU usage to implement and it's pretty much a no-brainer to enable. Dynamic content (PHP, ASP.NET, etc.) can also be compressed, but since it is compressed separately for every request, it can take up significant amounts of CPU utilization.

Below is a quick guide to enable HTTP compression in IIS:
  • Open up IIS manager and open up the properties for all web sites.
  • Under the service tab, select the "Compress static files" and enter the value of the Temporary directory where the cached files will be kept. In addition, you should limit the temporary directory size to 1 GB or so.
  • This will enable compression for .txt, .htm and .html files. However, .js and .css files can often be just as large as the HTML files.
  • To enable compression for other extensions, you'll need to edit the Metabase. I recommend using Metabase Explorer for this. You'll need to edit the W3SVC\Filters\Compression\gzip\HcFileExtensions key and change it from "htm,html,txt" to "htm,html,txt,js,css"
  • Now restart IIS to make the changes effective.
For more details, see the following url. This details how to turn it on for specific websites and other configuration options.

Wednesday, March 25, 2009

FFMPEG PHP installation on windows

We recently had a request from a client to install FFMPEG and the associated PHP module on a Windows server that was running Plesk 8.2 with PHP 5.2. This posed a bit of a problem because the FFMPEG project only releases source code releases, relying on others to make binary distributions. For linux distributions, it's usually in the package repository, but for windows, you have to dig around the internet until you can find someone that has compiled it for you, or you can compile it yourself. In addition, they refuse to go out of their way to make their code Windows friendly, which is fine, but it makes the process to compile it kind of complicated, since it doesn't work in Microsoft's C/C++ compiler by default, so you have to configure MinGW to compile it.

Finding a windows distribution of the main FFMPEG project was fairly easy. This site distributes binaries and also provides a very good guide on compiling it for yourself.

However, the PHP module is much harder. Especially since you have to find a module that is compatible with your version of PHP. Most of the available instructions point to PHP 4 modules, if you need a PHP 4 module, here is one good set of instructions. After much digging, I finally found a PHP 5 module here.

UPDATED: This link is now broken, we're currently hosting the PHP 5 module on our website here.

A complete set of instructions for completing this installation is below. My environment was Windows 2003, IIS 6, Plesk 8.2 and PHP 5.2.6:

  • If you plan to use the FFMPEG command-line tool, download the binary package from arrozcru.org. Use a tool such as 7-zip to decompress it and expand the tar file where you want to place it.
  • Download the zip file that includes the ffmpeg-php extension here and uncompress it. It includes several other software packages, you can ignore them, the files that we are interested in are in the ffmpeg-php-win32-all directory. UPDATED: This link is now broken, we're currently hosting the PHP 5 module on our website here.
  • Copy the avcodec-51.dll, avformat-51.dll, avutil-49.dll and pthreadGC2.dll files to the c:\windows\system32 directory.
  • Copy the php_ffmpeg.dll file to your PHP extensions directory. For me, this was "C:\Program Files\SWsoft\Plesk\Additional\PleskPHP5\ext"
  • Edit your php.ini file and add the following bit. For me this was located at "C:\Program Files\SWsoft\Plesk\Additional\PleskPHP5\php.ini"

    extension=php_ffmpeg.dll

  • If you are running PHP as an ISAPI filter, you'll probably need to restart IIS. I was running it as a CGI and I didn't need to restart.

Friday, February 13, 2009

Quick guide to UTF-8 in PHP regular expressions

There's a lot of different issues that come up with any sort of Unicode support in applications. Mainly because things get a lot more complicated than the standard 8-bit ASCII implementation. UTF-8 is the most common encoding in use for Unicode support. There have been many in-depth documents written about this and I encourage you to read them if you have to do anything more than modify a couple of lines of code. To modify regular expressions in PHP for UTF-8 characters, here are a couple of steps that can get you off the ground quickly:

* Use the preg functions, the ereg functions do not support Unicode and are going away in PHP 6.
* To enable unicode for a regex, add a /u flag. i.e.

if(preg_match("/[^[:space:]a-zA-Z0-9{1,}/u", $string)) {

* Find a good table of UTF-8 characters and their hexadecimal value, like this one. Use this table to look up the Unicode value, it should be in the format U+NNN where the NNN represents a variable length hexadecimal number. For example the euro symbol, € is U+20AC. To use this in a regular expression, use the \x{NNN} format, i.e. \x{20AC}.

* For example, to add € to the allowed characters in the above expression, use the following:

if(preg_match("/[^[:space:]a-zA-Z0-9\x{20AC}{1,}/u", $string)) {

Wednesday, February 4, 2009

Comparing email options for small/medium organizations

Often we'll have clients that need mail setup for their domain as almost an afterthought. The primary use of the domain is to serve a website to a global audience, and the e-mail addresses will primarily be used for customer support or communication among a small team. Usually, it's tacked on to the end of a list of requirements for server configuration, i.e. "oh yeah, and we'll need a mail server too." Generally "mail server" in this context means that they want SMTP, POP, IMAP, a webmail interface and an administrative interface that allows them manage their own user accounts and aliases. Unfortunately, this setup is a little more effort than just doing a "yum install mailserver", so this is generally what we recommend for mail server installation:

Don't do it.
Use a hosted solution instead, email is a headache to administer and is now standardized enough that it can be offered as a commodity. Standard edition Google Apps for business is free and meets most needs well, there are many other good solutions out there. However, this doesn't work for everyone, due to confidentiality concerns, customization needs, etc.

Zimbra

If you have the horsepower, run Zimbra. It's free, mostly open source and provides all of the functionality that I mentioned above along with several other features like calendaring. Unfortunately, it requires a lot of resources (especially memory) to run all of its separate components, so it usually needs its own server, which is overkill for a lot of <50 user installations.

Postfix + Dovecot + Squirrelmail + postfixadmin.
If you don't have the resources to run Zimbra and need to run an in-house mail server, this is probably your best bet for putting together a cost-effective system. Unfortunately, it requires more setup time than the other solutions, but you can easily run it on a low-powered server or in a virtual instance.

Qmail + Courier + Squirrelmail + qmailadmin
I'm not a big fan of qmail, but it does have a fair number of supporters and I support a couple of different installations, so I'll mention it. Similar to the Postfix bundle, it doesn't require many server resources, but can take a fair bit of setup time. However, qmail is generally more difficult to administer, less well supported, etc, so I would recommend using Postfix as your SMTP server.

Thursday, January 29, 2009

PHP file upload best practices

We've had a couple of different scenarios dealing with PHP file upload issues lately. Out of this, I've come up with some guidelines for using the default PHP file upload mechanism.

The first thing to do is to make sure that you are dealing with file upload errors properly. If an error occurs, it will be reported in the $_FILES['examplefile']['error'] field and a list of the error codes are detailed here.

PHP Settings

The most common problem is dealing with large file uploads, both due to the size of the files and the time it takes to upload the files from slower connections. Relevant settings that will need to be adjusted for larger files are:

upload_max_filesize
post_max_size
memory_limit

In addition, you'll need to make sure that you have the following settings adjusted to allow enough time for uploads to occur:

max_execution_time
max_input_time

Another method of limiting the size of file uploads is to have a form input with the name of MAX_FILE_SIZE. PHP will cut off uploads that are larger than the value of this field.


Apache Settings

By default, most Apache configurations do not need to be adjusted for file uploads. However, if you're using the LimitRequestBody directive, make sure that it is large enough to accomodate the uploaded files.

IIS Settings

In addition to the PHP settings for time limits, you will probably need to adjust settings in IIS to make sure that your connections do not time out. The most relevant metabase settings are:

ConnectionTimeout (defaults to 120 seconds)
CGITimeout (defaults to 500 seconds)